The Stories -
Printing a Booklet


Click
on the 'print' icon.


So - think like a kid. (Or you can just ask a kid to draw your pictures.)
Kids don't really mind what your pictures are like, they will be fascinated regardless. here are some ideas:
With each of the stories included on this website, we have included information about where the pictures came from.
Here is an example of making an illustration


So you have a story idea ...
the next step is to write it. It's a good idea to use "Word".
You want to end up with a book that looks like a book (with print on both sides of the page) - so how do you work out the order of the pages as you write them?
Don't worry. Just write your story. Here are some layout pointers:
You want to end up with a book that looks like a book (with print on both sides of the page) - so how do you work out the order of the pages as you write them?
Don't worry. Just write your story. Here are some layout pointers:
- It's a good idea to insert page numbers
as you go, just to make sure you eventually staple it together properly.
- When you print your booklet, it will be
A5 size. That is half of the normal A4 size.so you will need to use quite
a large font size (about 20, depending on which font you are using).
- Type your story in "portrait"
layout - in the booklet the paper will be "landscape" with two
(portrait) pages next to each other.
- Leave reasonable margins - the default
margins setting is fine, do NOT change to 'narrow'.
- You can insert a header and/or footer
with the title of your story and/or your name as author, or any other
useful information.
- You can insert a 'cover page' from the
selection offered in 'Word', and then change the picture for one of your
own. (Right mouse on the picture, click 'change picture'). Or just design
your own.
When your story is done, and hopefully you have been able to add
some pictures / photos / illustrations ... here is how to print your document
as a booklet:
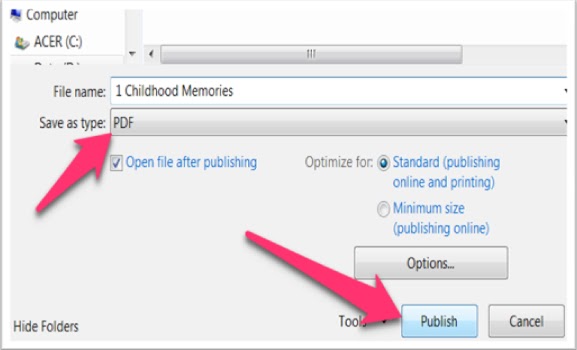
1. Save your document as a pdf.
Click
on 'file' (top left) and select 'Save As'.


When you see the dialogue box asking for the name of your new
file, click the arrow underneath this space where it says 'save as type:' and
select your file type as 'pdf'.

Now you just need to click the 'publish' button. Your document
will appear in pdf format.

2. Print your document as a booklet

In the 'print' dialogue box look for the 'booklet' option. It
will be in the middle under 'page size and handling'.

Also make sure you have selected the 'both sides' printing option.
And then click 'Print'.
After printing one side of the pages,
your printer will send instructions about turning over your pages and
re-inserting them into your printer. How this works will depend on your
particular printer.

If you have
a big enough stapler, you can now put a staple or two right into the middle
fold of your booklet. If you only have a small stapler, then you will need to
fold the booklet and put a couple of staples along the back edge.
The Pictures
Honestly, for a lot of children the most important part of a story is
the pictures. If they like the pictures then they will want to read the words.
So - where do you get the pictures from?
- If
you are printing one or two stories / booklets for just your class to use, then there is
really no harm in searching Google Images and using whatever you like.
- If you are self-publishing a story / booklet that may be made generally available in print and/or on the Internet, then you need to be careful about copyright. Do not steal pictures or ideas from someone else.
So - where are we getting the pictures from?
1. Photos
we have taken - we have copyright on them.
2. Drawings
and pictures the children have created.
3. Pictures
we have drawn / created.
Creating Your Own Pictures
Most adults tell me they can't draw.
And yet kids rarely say that. If you ask a kid to draw something, they just give it a go.
And yet kids rarely say that. If you ask a kid to draw something, they just give it a go.
So - think like a kid. (Or you can just ask a kid to draw your pictures.)
Kids don't really mind what your pictures are like, they will be fascinated regardless. here are some ideas:
- Use
the tools that kids like
to use - get yourself some crayons / pencils / paints. I usually draw the
picture and then scan it and insert it into the story.
- Keep
it simple - you don't
have to draw the whole panorama. There are many ways to draw a picture
without drawing faces - if that is the part you have difficulty with. Just
draw the important part.
- Use
lots of colour.
Or do it in black and white and let the children colour it in. (Black and
white is better for print / photocopy. It depends how you are going to use
the book.)
- Adapt
and practise.
Find a picture or photo that has all or part of what you want to depict,
and try copying it ... but don't worry if yours doesn't look the same! The
original is just a starting point. And you don't want to break copyright
by making it exactly the same.
- Use
an App.
This is my favourite. Rather than drawing and then scanning pictures, I
like to draw / create pictures on my iPad. Maybe you have access to
something similar.
With each of the stories included on this website, we have included information about where the pictures came from.
Here is an example of making an illustration
This
is how I have been creating illustrations.
1. Enter a search word into Google Images search - in this case I wanted a picture of someone "window shopping".
1. Enter a search word into Google Images search - in this case I wanted a picture of someone "window shopping".

I selected this picture.
2. Trace the picture, and adapt it to suit my story. (I use the app
"Tracing Paper" on my iPad.)

I
changed it into a picture of two women in headscarves window shopping.
3. Colour the picture. I use that old program that comes on most computers - "Paint". If you have never used it, you should check whether you have it on your computer (you probably do) and try it, because it is a lot of fun. You can use it for drawing as well.

Why
don't we just use the original picture? Because it's not mine, the copyright
belongs to someone. But this is MY picture, my drawing and my colouring
No comments:
Post a Comment